Levels of Drywall Finish Explained: The Guide for Contractors
A finished wall gets painted over. Nobody reads the spec sheet pinned to the door. So when the homeowner turns on a floor lamp, walks past the feature wall, and calls back three weeks later, every misaligned expectation becomes a dispute.
Miscommunication over drywall finish levels is one of the most common and most avoidable problems in residential and commercial construction.
The fix is simple: get specific before the first coat of mud goes on. That's exactly what the levels of drywall finish explained in this blog will help you do.
Why the Drywall Finish Level System Exists
In 1990, the Gypsum Association partnered with the Association of the Wall and Ceiling Industry (AWCI), the Ceilings & Interior Systems Construction Association (CISCA), the Drywall Finishing Council, and the Painting Contractors of America to solve a real industry problem. Architects, contractors, and owners were using completely different language to describe the same wall finish, and nobody was on the same page.
Their solution was GA-214: a published standard that defines six finish levels, numbered 0 through 5. The document was updated in 2021 as GA-214-2021 and is now available as a free download from the Gypsum Association. As Robert Grupe, Director of Technical Services at AWCI, stated at the release: "The levels of finish, as described in GA-214, are consistently written into architectural specifications to set expectations among and between contractors, designers, and owners."
Every contractor in Texas, Florida, Georgia, or anywhere else in the country should know this document by name. It is the universal language of drywall finishing.
The Six Levels of Drywall Finish, Explained Level by Level
Level 0: No Finish
No tape. No mud. No corner bead. The drywall is hung and that's it. Level 0 is called out in specs when the work is temporary, the design is still undecided, or the space won't be occupied. It requires no finishing labor beyond the hang itself.
Level 1: Fire Tape
Level 1 is purely functional. All seams, flat joints, butt joints, interior angles receive embedded tape and joint compound. Corner beads go on. Screw heads get a single coat. Nothing is sanded or smoothed for appearance.
This standard exists for fire code compliance, not aesthetics. Garages, mechanical rooms, plenum spaces above dropped ceilings, and attics are typical Level 1 applications. The wall will show raw tape lines and uncovered fasteners. That is by design.
Level 2: One Skim Coat Over Joints
At Level 2, one additional coat of joint compound goes over all taped joints, angles, and fastener heads. The tape is still visible underneath, this coat just covers it.
Level 2 is used where heavy texture, tile adhesive, or thick wallcovering will go on top of the drywall. The overlying material hides the surface, so spending labor on a smoother finish is wasteful. Warehouses and storage areas that will receive spray texture commonly land here.
Level 3: Texture-Ready Finish
Level 3 adds a full second coat over everything, joints, angles, corner beads, and fasteners. The surface is sanded after this coat, but tool marks, slight ridges, and minor imperfections are acceptable because a texture coat will go on top.
This is the standard finish when knockdown, skip-trowel, or orange peel texture is specified. In high-volume residential construction across Houston, Jacksonville, and Atlanta, Level 3 with texture is extremely common, it's economical and produces a good-looking painted wall under most interior lighting conditions.
Under no circumstances should a Level 3 surface be painted flat without texture. Under any directional or natural light, the surface variation will show through.
Level 4: The Standard Smooth Finish
Level 4 means three full coats over all joints, angles, corner beads, and fasteners. The surface is sanded smooth and paint-ready. No tape ridges. No screw crowns. No visible belly in the flat joints. The wall should look clean and flat under normal interior lighting and accept paint directly.
Most residential drywall in the United States receives a Level 4 finish. It is the baseline smooth wall specification for painted surfaces in living rooms, bedrooms, offices, and most commercial interiors. The quality difference between a properly executed Level 4 and a rushed one is significant, and it shows under light.
Level 5: Premium Skim-Coat Finish
Level 5 goes beyond Level 4 by applying a full skim coat of joint compound, or a spray-applied primer surfacer across the entire wall surface, not just the joints. This equalizes the porosity and texture difference between the drywall paper and the dried joint compound beneath, eliminating any surface variation before paint goes on.
The reason this matters: under flat paint and normal lighting, drywall paper and dried mud look the same. Under high-gloss paint, deep saturated colors, or strong raking light near large windows, the contrast between the two materials creates a subtle "joint photographing" or "flashing" effect that is impossible to fix after painting without stripping the wall. Level 5 prevents that entirely.
High-end custom homes, art galleries, feature walls, kitchens with semi-gloss paint, and any space with significant natural light are prime Level 5 applications. Many finishers across Dallas, Miami, and Nashville have moved to spray-applied primer surfacer as the Level 5 method of choice, it delivers a highly consistent result and is faster than hand-skimming a full room.
Levels of Drywall Finish Explained: At-a-Glance Reference Table
Level 3 vs. Level 4 Drywall Finish: What's the Practical Difference?
The gap between Level 3 and Level 4 is one extra coat of mud and what that coat accomplishes. Level 3 fills the joints. Level 4 finishes them, feathering the edges flat, sanding to a true smooth surface, and producing a wall that can take paint without texture covering the imperfections.
For homeowners asking whether Level 3 is good enough: it depends entirely on your lighting and your paint plan. Bedrooms, hallways, and low-light spaces can look excellent with a properly executed Level 3 and a light texture. Open-plan living spaces with large south-facing windows, clerestory glazing, or prominent display walls need Level 4 at minimum.
For contractors: a genuine Level 4 is harder to achieve consistently than many tapers let on. It requires correct coat sequencing, adequate drying time between coats, and careful sanding. Short-cutting the process produces a Level 3 labeled as Level 4, something the client will notice the first time they turn on a lamp next to the wall.
Level 4 vs. Level 5: When Does the Upgrade Make Sense?
Most rooms in most homes do not need Level 5. That is not a compromise, it is an accurate statement. Under standard interior lighting and flat or eggshell paint, a properly executed Level 4 finish is indistinguishable from Level 5. The upgrade is justified only when the specific conditions in the table above apply.
The smart approach on custom homes: specify Level 5 on primary living spaces, key feature walls, and rooms with significant natural light. Hold Level 4 on secondary bedrooms, closets, and utility spaces. That balance delivers the visual result the client is paying for without inflating the finishing budget across every square foot of wall area.
What Do These Finish Levels Actually Cost?
Finish level is the single biggest variable in drywall finishing labor cost. Here are realistic ranges:
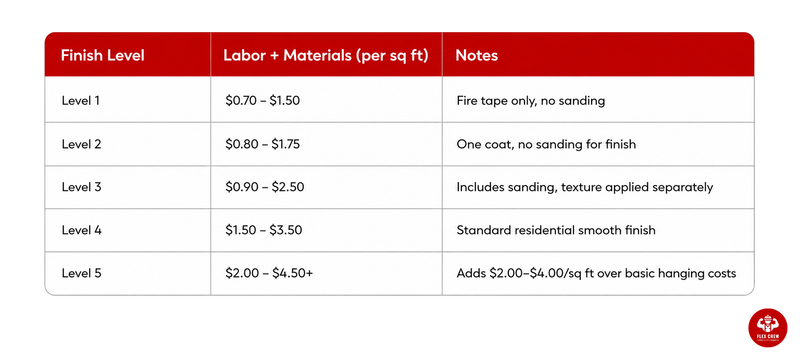
Labor makes up 65–75% of total drywall installation cost, which is why finish level selection directly drives project budgets. On a 2,000-square-foot home, the difference between specifying Level 4 throughout versus Level 5 on primary spaces can easily run several thousand dollars. Get the level right on paper before anyone picks up a trowel.
A Level 5 finish can add $2.00–$4.00 per square foot over basic hanging costs, a meaningful number on large projects, and a justifiable one in the right rooms.
The Finish Level Your Painter Needs to Know
One detail that catches projects off guard: the finish level affects what your painter can do, not just what the finisher delivers.
A Level 4 wall painted with high-gloss paint in a room with strong natural light will flash, meaning the joint locations will photograph through the sheen. That is not a finishing failure. That is a specification mismatch. The painter applying high-gloss or semi-gloss paint to a wall needs Level 5 underneath it to get the result the client expects.
This is why experienced general contractors specify finish level and paint sheen together, before work begins, not as two separate decisions made by two separate trades weeks apart.
Getting the Right Finisher for the Level You're Specifying
Knowing the finish level is half the equation. The other half is putting the right people on the work. A Level 5 specification written into a contract means nothing if the finisher on site doesn't have the skill to execute it, and in today's construction labor market, that gap is very real.
Labor shortages across Texas, Florida, Georgia, and other high-growth markets have made finding consistent, skilled drywall finishers one of the more difficult parts of running a tight job schedule.
FlexCrew connects contractors and builders in these markets with vetted skilled tradespeople, including experienced drywall finishers who understand finish level specifications and can execute them reliably, from Level 3 production builds to Level 5 custom homes.
For tradespeople looking to connect with the right contractors, FlexCrew's AI-powered resume builder helps finishers present their experience clearly, including finish types, project scale, and specialty work, so the right match gets made before anyone shows up on site.
Levels of Drywall Finish Explained: Final Word
The finish level system has been the industry standard for over 30 years. It exists because vague language costs everyone money. A wall is not "smooth" or "rough", it is a Level 3, a Level 4, or a Level 5, and each one means something specific to every trade on the job.
Specify the level in writing. Confirm it matches the paint plan. Put a finisher on the job who can actually deliver it. That three-step process eliminates most of the callbacks, disputes, and re-do costs that come from unmet finish expectations, whether you're building in Dallas, Tampa, Atlanta, or anywhere else.
For construction staffing and skilled trades hiring across the South and Southeast, FlexCrew is built to help contractors staff the right people for exactly this kind of work.